Posts

HUMMINGBIRD BOARDS AND SCRATCH

Image
Our last workshop focused on using the Visual Programmer Language (VPL) to control sensors, motors, and LED's plugged into Hummingbird Boards.  While participants developed a number of very creative, interactive devices (I'll show some examples in the next post), some folks realized there were some limits to what they could build using VPL.  One group wished to build a sound activated stop light for their cafeteria.  They were able to build a light that would stay green until a certain noise level was reached, then it would turn red.  But we couldn't find a way to add an intermediate orange "Warning" light.  There might be a way to do that with VPL, but it might be simpler just to use the Scratch programming language.  Hummingbird does provide an example of a traffic light as part of their Scratch tutorial, and I'll provide a link to that site further down in this post. Installing Scratch for the Hummingbird does require some extra steps and a couple of d...

Hummingbird Board Workshop

Image
In this workshop we'll be reviewing the basics for connecting and programming your Hummingbird Board using the Visual Programmer Language.  We'll also look at some example projects, from the Hummingbird site, and talk about possible SOL topics that might be good fits for students Hummingbird projects.  I've uploaded the PowerPoint for the talk here .  I've included some links in the presentation, for sample projects as well as a great tutorial on the Hummingbird.  The materials can all be found on the www.hummingbirdkit.com site under the Learning (tutorial) and Teaching (sample projects) tabs.

SOMETHING NEW FOR CODING - The micro:bit

Image
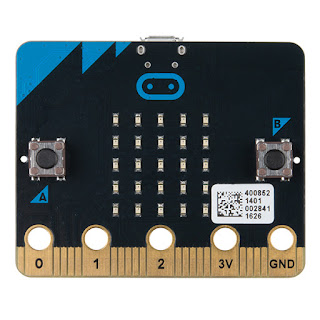
The BBC micro:bit is a very small (about half the size of a credit card), affordable ($16.50 for Sparkfun.com's Go bundle which includes the micro:bit, a cable, battery pack and batteries) codeable computer. The online coding environment lets you program with a Microsoft Block Editor (very similar to Scratch), Python, Java, or C++.  The environment includes an image simulating the bit so that programs can be tested online before downloading to the micro:bit. It's very easy to develop programs that let you control the LED array and the two buttons, creating scrolling text messages, images, and simple games.  The bit also has a motion detector and a compass. Sparkfun has put together a number of kits for extending the micro:bit including a weather station, robot car, and Inventor's Kit.  Sparkfun has also developed some excellent (as usual) video tutorials and guides for the bit.  Here's the link to the Go bundle and beginner's tutorial: https://www.sp...

ORGANIZING YOUR STEMLab

ORGANIZING YOUR STEMLab      The basic physical setup for a STEMLab is fairly simple; a room with tables and storage shelves. How the tools and materials in that lab are organized can be a bit more complex, depending on how your STEMLab will be used. In some cases, all activities will take place in the STEMLab. If this is the case, the organization plan is fairly straightforward – tools and materials are organized by type and stored on shelved in labeled plastic bins. Space is also provided for ongoing student work/projects. A separate table might be reserved for larger items such as the 3D printer. You might also want to reserve a table for drilling and sawing and one for soldering.      If you don't have a separate room set up as a STEMLab, you might still want to organize materials in plastic bins (see below).  When teachers need materials for a project, they can go to the materials and tools storage area and fill an empty bin, or a few smaller...

Preparing for the Summer Workshop - Software You'll Need

Image
SOFTWARE DOWNLOADS FOR STEMLab TRAINING  There are three programs you'll need to download to control your 3D printer, make use of your Vernier sensors, and program your Hummingbird Board.  They are all free downloads.  I've copied the links and instructions for downloading below: Dremel 3D printer software. This is the software you’ll use to prepare objects for printing on the Dremel. It will allow you to do things to the model like changing size, selecting print quality, and setting infill (hollow – solid.) To download: - Go to the Dremel site, https://3dprinter.dremel.com/ - In the upper right hand corner of the page you’ll see a Create Profile option, click on that. You’ll be asked to enter an e-mail and create a password. Once you’ve done this, you can then click on the Sign In option. - Once you’ve signed in, click on the Support choice on the menu line. That will open a list of options, choose Downloads. When the Downloads page opens, choose Software. On t...

Hummingbird Boards and 3D Printing: You won't believe what happened next...

Image
At our last meeting in Warsaw, a teacher asked about combining Hummingbird Boards and other STEMLab tools such as 3D printers and Vernier Sensors.  With that in mind I took a look at the Hummingbirdkit.com site to see if they had any ideas/tutorials for doing just that.  They definitely do! If you go to the site and choose the Tutorials button ( http://hummingbirdkit.com/learning/tutorials ) you'll go a list of great tutorials dealing with these topics.  Make sure you choose Hummingbird and other Maker Tools in the Find Tutorials Tagged option field and you'll see an annotated list of topics including Vernier Sensors, Makey Makey, Arduinos, and Squishy Circuits. I want to talk a bit about the 3D printing option.  When you go to the page you'll see a number of pictures for individual parts (gears, pulleys, motor mounts, led diffusers, etc.)  Clicking on the picture will also download the .stl file for 3D printing.  There are also two example projects: - ...

Building with the Hummingbird board - a cat treat dispenser and a mobile robot

Image
If you're wanting to get started with the Hummingbird kit, there are some great introductory projects for the Hummingbird board at these sites: https://blog.arduino.cc/2017/01/25/build-an-automatic-cat-treat-dispenser-with-hummingbird/ This site also shows how the program would look in the Visual Programmer interface. As you can see, the code is pretty simple.  The program begins with a blinking LED (this code doesn't show up in the photo, it's above the sensor block.)  Then you drag the Sensor block into the program editor, making sure the light sensor option is selected.  Once the program starts, the cat will see the blinking LED, swat at it (covering it up briefly making it dark) then the left column (Darker) actions will happen. First the led goes off, then the servo motor moves the craft stick gate up and treats move down the slide.  Then the second servo expression moves the gate back down, and since the cat's paw is no longer covering the light sensor, t...