Posts

THE SNAPINO - An introduction to the Arduino and data collection

Image
     One feature of the Arduino board is that it does so much and there are so many possible projects, it's a bit intimidating.  For younger or newer programmers, a good introduction to the Arduino is through the Snapino Snap Circuits kit.      The Snapino links Snap Circuits components to an Arduino.  The set is relatively inexpensive (about $50.00) and is available on Amazon.com. The Arduino is mounted on a Snap Circuits adapter and can easily be plugged into any Snap Circuits project.    An Arduino board and several Snap Circuits blocks, including a light sensor, are included.      The project below, taken from the Snap Circuits manual included with the kit, is for a simple light monitor.  The manual provides clear, helpful instructions for building the circuit, downloading the software, and running the program.  The program and the circuit setup are well-documented.  And, since students have access to ...

ONLINE LEARNING AND DATA COLLECTION WITH THE MICROBIT

Data Collection      Microbit.org has provided a great resource for using the Microbit for data collection.  They have an excellent introduction, complete with video tutorial and sample code, for Data Collection, and a number of suggested experiments involving collecting data.  Each experiment has an Overview, Setup, and Procedure section - again with video tutorials and sample code.  The experiment topics are: Population Traits, Temperature, Soil Moisture, Gravity, Motion and Waves, Body, Electrical and Waves, Electricity, and Rocket Acceleration.  Material needs are minimal, usually a microbit, batteries, cable, copper wire, and access to a spreadsheet program for data analysis.  Some of the experiments make use of two Microbits and the Radio code blocks that allow Microbits to communicate with one another.      The overview is here (there are links to all the experiments in a sidebar): https://makecode.microbit.org/courses/ucp...

Micro:bit Photogate

Image
         Bob Bumgarner, a Physics teacher at King George High School, programmed a Micro:bit so that it could be used as a photogate, a device for very accurate timing.  He also designed a holder for the bit using Tinkercad, and 3D printed it.  Bob was generous enough to provide his description of the project, the Micro:bit code, and the .stl file for the holder.  This is a very practical use for both the micro:bit and 3D design/printing.  As Bob points out, it is a way to save a good bit of money on lab equipment.  To read Bob's report click here , the code is here , and the .stl file is here . Photogate Photogate code for Micro:bit Photogate holder in Tinkercad

Colonial Beach STEM Club

Image
This is a link to the Colonial Beach STEM Club site.  Lots of good resources, videos, and handouts.

April Workshop Part 2 - Friends of the Rappahannock

Image
         In this post you'll find links to the documents provided by Nancy Stalik and Daria Blom, educators from the Friends of the Rappahannock . The introduction to E-STEM PowerPoint The Stormwater Sediment Filter Design Brief The Sediment Filter Data Sheet The  soil that was used during the workshop

April Workshop Part 1 - Ozobots

Image
     I'll be doing additional posts for our April workshop including some great design briefs created by  participants, session handouts, and some additional information about Biomimicry.  This post will provide some information about Ozobots and links to the documents Emily Sheckels provided for her sessions.      Ozobots are small robots that can be used to teach pre-coding skills (The Bit) or programming (The Evo.)  The Bit is a line following bot that can also "see" red, blue, and green.  You can program the bot by adding a variety of color sequence blocks (red-blue-red) to the black line the robot follows.  There are a number of sequences and each one causes the bot to execute some command, such as Reverse, Speed Up, or Turn Left .  The programmer creates the route for the bot by drawing a black line and then adding color sequences as needed.  The route is created using standard markers and paper.  The kit...

3D Printing and the Arts: Lithophanes

Image
     A recent post on the SparkFun website introduced the idea of using a 3D printer to produce a Lithophane. As the post explains, lithophanes are "...a specific kind of artwork that can only be seen clearly when backlit, meaning light is an element of this creative technique. Traditionally, a lithophane is a thin porcelain tile with an etched artwork on one side. Porcelain has a translucent quality when the walls are thin enough, so by carving into a thin tile, artist were able to make lithophanes by hand."      The post provides a link to a free lithophane generator here: http://3dp.rocks/lithophane/ ,  It's very easy to use, you upload a photo, choose a format (flat, curved, cylinder) and it quickly creates an .stl file for downloading. The Sparkfun post provides some example pictures and they turned out pretty well. I decided to try this out with a color photo of my own. I chose one that was a bit complicated, a photo of my granddaughter pa...

The FINCH Robot

Image
     The Finch Robot is a small robot produced by BirdBrain Technologies , the same company that makes the Hummingbird board. If you're familiar with the Hummingbird board, you'll find the Finch very easy to work with, especially if you use the Finch version of Visual Programmer.  One way to think of the Finch is that it's very much like a Hummingbird board with sensors, motors, and LED's already connected and the whole thing is placed inside a robot body.      The Robot costs $99.00 but make sure you check into the 10% Educator's discount.  It comes completely assembled, with a long USB cable that links the bot to your computer.  Like the Hummingbird, it must be tethered to the computer but the long cable gives you plenty of room to test  your programs.  You can program the Finch in a number of languages including Visual Programmer, Snap, and Scratch.  The website, www.finchrobot.com , provides lots of helpful info...

More Micro:bit Part 2

Image
     While the Micro:bit on its own provides a great way to learn programming, you can really extend the learning by making use of the accessory kits provided by Sparkfun.com   Students will still use the online Microbit.org site for coding and downloading their program to a bit, the kits allow them to plug their programmed bit into a weather station, vehicle, or arcade game.       I've worked with two of the kits (weather station and vehicle) and they are very easy to assemble and they work as advertised.  I especially like the Micro:bot kit.  Being able to code then quickly test your code with a robot you just assembled provides a great learning experience.  I know you can do this with a number of other robots - sending your code via Bluetooth, Wireless, or cable - but the act of plugging the "brain" into your robot and then seeing it execute (or not) your instructions is somehow a better experience. The SparkFun micro:bo...

More Micro:bit Part 1

Image
I had a brief post about the Micro:bit back in early September but I wanted to go into some more detail about the board and what you can do with it.  Sparkfun.com is still a great source for the Micro:bit and all of the accessories I'll talk about today - and they also have some great video tutorials for learning about the bit and the extra kits.  Here's the site:   https://www.sparkfun.com/microbit The Micro:bit Go Bundle is a great start, it costs only $16.50 and you get the bit, USB cable, and battery pack with batteries.  Prices on Amazon are a bit higher so I'd recommend buying from Sparkfun. Once you have the bit you can start programming at the Micro:bit site, www.microbit.org   Actually, you can start programming without the bit, since the site provides a very good interactive simulation of the board.  Once you're at the site, choose the Let's Code option from the menu bar.  If you are new to programming you can then choose the J ...

Dr. Sumner's Workshop Power Point on Geometric Algebra

This is a link to Dr. Sumner's workshop Power Point on Geometric Algebra using historic examples. https://drive.google.com/file/d/16o6HKhcJlTAvcO5ndLHAyYKWoDxHY9wd/view?usp=sharing

Tessellations and Tinkercad

Image
     This is a link to a video tutorial on using Tinkercad to design tessellations.  Once you've designed your tessellation you can export the file for 3D printing. http://mdirsstutorials.blogspot.com/2017/11/design-and-3d-print-tessellations-with.html       This looks like a very interesting website with several posts on Tinkercad, tessellations, and 3D printing.  Here is the link to the site home page:   http://mdirsstutorials.blogspot.com/

ARDUINO Workshop Materials

Image
The link below will open a PDF file for the Arduino presentation. https://drive.google.com/file/d/1DkR_7CFXzR7tY_CeCpoJ3oeszZle61KQ/view?usp=sharing

Using Vernier Sensors to Align Mathematics and Science - Dr. Sumner's Presentation

Image
I've linked a PDF copy of Dr. Suzanne Sumner's workshop presentation on using Vernier Sensors to align Math and Science.  Suzanne provides several good examples and helpful links.  To see the presentation, click here .

Power Point From Hummingbird Workshop

I've posted a PDF of the Hummingbird Workshop Power Point here: Hummingbird Workshop The Power Point has a number of links to helpful documents and tutorials on the Hummingbird workshop as well as some ideas for using the boards for SOL activities and lessons.

TeacherGeek STEM Check: A quick guide for real STEM activities

Image
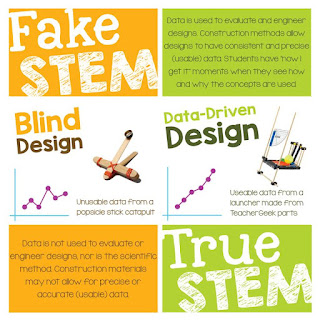
      TeacherGeek is an online site for Makerspace/STEMLab materials, components, activities, and ideas.  I'll be doing a post just about this site in the next week or so, but they also provide an excellent guide for determining if your STEM activity is really STEM, allowing for a lot of student creation and innovation, or an activity that simply has students following a set of instructions.  The guide is available on their website under the Documents and Videos tab, but I've provided a link to the PDF here as well:   TeacherGeek STEM Check

Graphical Analysis Software for Vernier Sensors

Image
     Vernier has a free software download named Graphical Analysis that does the curve fitting that Logger Pro does, but Logger Lite doesn’t.      The options are listed in the attached screenshot:  Proportional, Linear, Quadratic, Power, Inverse, Inverse Squared, Natural Exponent, Natural Log. Suzanne

Pictures from 3D Printing - Vernier Sensor Workshop

Image
Photos from the 3D Printing and Vernier Sensor Workshop at St. Clare Walker Middle School.  Lots of creative 3D design and printing and lots of practice with Vernier sensors. 3D Printed Carbon Atom Wind Turbine 3D Printed Mantis Sign for Spanish Class Dr. Sumner Working with Vernier Sensors Vernier Motion Sensor House Design in Tinkercad                                                              Energy Sensor Chicken or the Egg? 3D Printed Race Medals Dr. Sumner talking about Vernier Sensors

3D Printing and Vernier Sensor Workshop Power Points

Links for the Workshop Presentations 3D Printing Vernier Sensors

PHOTOS FROM THE HUMMINGBIRD WORKSHOP

Image
These photos are from the Sept. 23rd Hummingbird workshop at Montross Middle School.  Lots of creative inventing - angle indicators, trash sensing and removal machines for drains, rubber band launchers, dump trucks with flashing lights and backup signals, and more.